


一、环境:
ubuntu16.04 G++ 5.4 cuda 8.0 cudnn6.0
二、安装依赖包
1.安装opencv依赖包
sudo apt-get install build-essential

sudo apt-get install cmake git libgtk2.0-dev pkg-config libavcodec-dev libavformat-dev libswscale-dev

sudo apt-get install python-dev python-numpy libtbb2 libtbb-dev libjpeg-dev libpng-dev libtiff-dev libjasper-dev libdc1394-22-dev

sudo apt-get install libavcodec-dev libavformat-dev libswscale-dev libv4l-dev liblapacke-dev

sudo apt-get install libxvidcore-dev libx264-dev

sudo apt-get install libatlas-base-dev gfortran

sudo apt-get install ffmpeg
2.安装qt5(可选)
a.下载安装qt5
至官网下载 http://download.qt.io/archive/qt
cd 定位至下载目录
给文件授权
chmod +x qt-opensource-linux-x64-5.9.1.run
安装
./qt-opensource-linux-x64-5.9.1.run
b.安装opengl依赖
sudo apt-get install mesa-common-dev

sudo apt-get install libglu1-mesa-dev -y
三、下载并安装opencv
1.下载opencv3.3
 wget https://github.com/opencv/opencv/archive/3.2.0.zip

 wget https://github.com/opencv/opencv_contrib/archive/3.3.0.zip
2.配置opencv,分为支持cuda模式和不支持的配置模式
将上述opencv包解压,然后cmake配置属性
cd opencv-3.3.0

mkdir build

cd build
a.按装不支持cuda的配置
cmake -D CMAKE_BUILD_TYPE=RELEASE \
-D CMAKE_INSTALL_PREFIX=/home/fanzong/anaconda2/envs/tensorflow \
-D INSTALL_PYTHON_EXAMPLES=ON \
-D INSTALL_C_EXAMPLES=OFF \
-D OPENCV_EXTRA_MODULES_PATH=~/opencv_contrib-3.3.0/modules \
-D PYTHON_EXCUTABLE=/home/fanzong/anaconda2/envs/tensorflow/bin/python \
-D WITH_TBB=ON \
-D WITH_V4L=ON \
-D WITH_QT=ON \ # 需要QT安装支持,否则请不要执行此行
-D WITH_GTK=ON \
-D WITH_OPENGL=ON \
-D BUILD_EXAMPLES=ON .. # cmake命令的使用方式:cmake [
b.支持cuda的配置
cmake -D CMAKE_BUILD_TYPE=RELEASE \

-D CMAKE_INSTALL_PREFIX=/usr/local \

-D INSTALL_PYTHON_EXAMPLES=ON \

-D INSTALL_C_EXAMPLES=OFF \

-D OPENCV_EXTRA_MODULES_PATH=~/opencv_contrib-3.3.0/modules \

-D PYTHON_EXCUTABLE=/usr/bin/python \

-D WITH_CUDA=ON \

-D WITH_CUBLAS=ON \

-D DCUDA_NVCC_FLAGS="-D_FORCE_INLINES" \

-D CUDA_ARCH_BIN="8.0" \

-D CUDA_ARCH_PTX="" \

-D CUDA_FAST_MATH=ON \

-D WITH_TBB=ON \

-D WITH_V4L=ON \

-D WITH_QT=ON \

-D WITH_GTK=ON \

-D WITH_OPENGL=ON \

-D BUILD_EXAMPLES=ON ..
编译文件
make -j4

sudo make install

sudo /bin/bash -c 'echo "/usr/local/lib" > /etc/ld.so.conf.d/opencv.conf'

sudo ldconfig
四、测试opencv程序
选择->文件→新建项目→控制台程序,如下图所示:
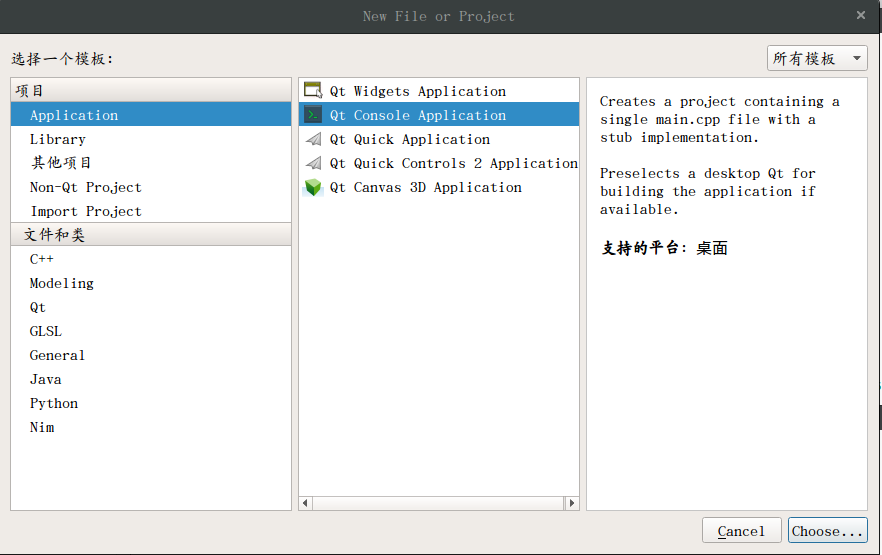
然后选择编译方式为qmake
假设我们新建了名为test1的项目,现在要更改以下两个文件
1.test1.pro
QT += core

QT -= gui
CONFIG += c++11
TARGET = test1
CONFIG += console
CONFIG -= app_bundle
INCLUDEPATH += /home/gx/opencv-3.3.0/include \
/home/gx/opencv-3.3.0/include/opencv \
/home/gx/opencv-3.3.0/include/opencv2
LIBS += -lopencv_core -lopencv_highgui -lopencv_imgproc -lm -lstdc++ -lgomp
TEMPLATE = app
SOURCES += main.cpp
# The following define makes your compiler emit warnings if you use
# any feature of Qt which as been marked deprecated (the exact warnings
# depend on your compiler). Please consult the documentation of the
# deprecated API in order to know how to port your code away from it.
DEFINES += QT_DEPRECATED_WARNINGS
# You can also make your code fail to compile if you use deprecated APIs.
# In order to do so, uncomment the following line.
# You can also select to disable deprecated APIs only up to a certain version of Qt.
#DEFINES += QT_DISABLE_DEPRECATED_BEFORE=0x060000 # disables all the APIs deprecated before Qt 6.0.0
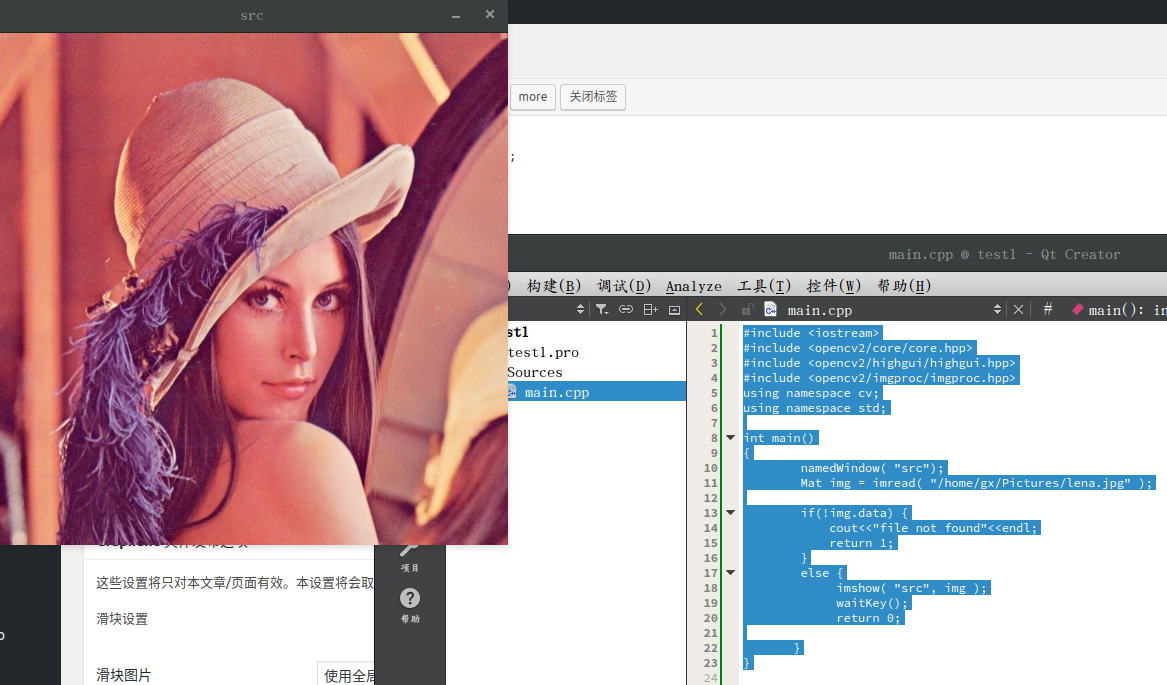
main.cpp
#include

#include

#include

#include

using namespace cv;

using namespace std;
int main()
{
namedWindow( "src");
Mat img = imread( "/home/Pictures/lena.jpg" );
if(!img.data) {
cout<<"file not found"<
测试效果如下图
近期评论